NestJS: Middleware와 Interceptor가 무슨 차이고 어떻게 사용할까?
NestJS로 백엔드를 개발하다 보면 middleware와 interceptor를 언제 사용해야 할지 헷갈릴 때가 있어요. 두 기능 모두 요청과 응답 사이에 로직을 추가할 수 있지만, 실행 시점과 할 수 있는 작업이 다릅니다.
이 글에서는 NestJS의 request lifecycle을 기반으로 middleware와 interceptor의 차이점을 명확하게 정리하고, 실무에서 어떤 상황에 무엇을 사용해야 하는지 알아보겠습니다.
NestJS Request Lifecycle 이해하기
NestJS에서 요청이 들어오고 응답이 나가기까지의 과정을 request lifecycle이라고 합니다. 이 흐름을 이해하면 middleware와 interceptor가 어디서 실행되는지 명확히 알 수 있어요.
Request Lifecycle 순서
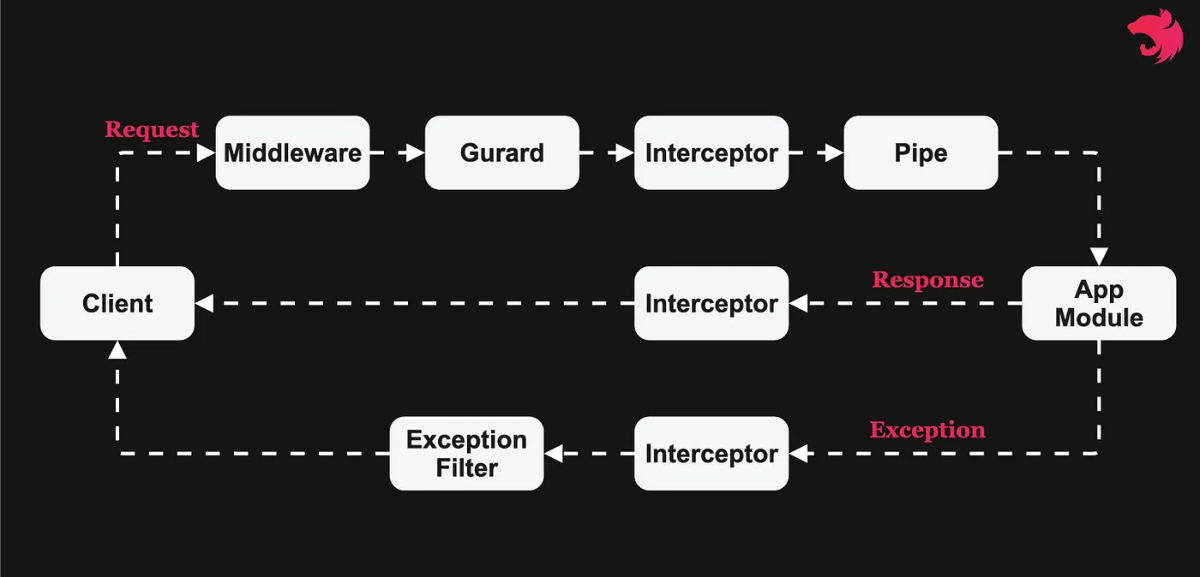
이 순서를 보면 middleware는 가장 앞에서, interceptor는 컨트롤러 전후로 실행됩니다. 이 차이가 각각의 용도를 결정하는 핵심이에요.
Middleware란?
Middleware는 라우트 핸들러가 실행되기 전에 호출되는 함수입니다. Express의 middleware와 동일한 개념이며, request, response, next() 함수에 접근할 수 있어요.
Middleware의 주요 기능
- 임의의 코드 실행
- request와 response 객체 수정
- request-response cycle 종료
- 다음 middleware 호출
Middleware 구현 방법
클래스 기반과 함수형, 두 가지 방식으로 구현할 수 있습니다.
클래스 기반 middleware:
import { Injectable, NestMiddleware } from '@nestjs/common';
import { Request, Response, NextFunction } from 'express';

@Injectable()
export class LoggerMiddleware implements NestMiddleware {
  use(req: Request, res: Response, next: NextFunction) {
    console.log(`[${req.method}] ${req.url}`);
    next();
  }
}
함수형 middleware:
export function logger(req: Request, res: Response, next: NextFunction) {
  console.log(`[${req.method}] ${req.url}`);
  next();
}
Middleware 적용하기
모듈의 configure() 메서드를 통해 적용합니다:
import { Module, NestModule, MiddlewareConsumer } from '@nestjs/common';

@Module({})
export class AppModule implements NestModule {
  configure(consumer: MiddlewareConsumer) {
    consumer
      .apply(LoggerMiddleware)
      .forRoutes('users'); // 특정 경로에만 적용
  }
}
특정 경로를 제외하고 싶다면 exclude()를 사용하세요:
consumer
  .apply(LoggerMiddleware)
  .exclude(
    { path: 'users', method: RequestMethod.GET },
    'users/(.*)',
  )
  .forRoutes(UsersController);
전역으로 적용하려면 main.ts에서 설정합니다:
const app = await NestFactory.create(AppModule);
app.use(logger);
Interceptor란?
Interceptor는 @Injectable() 데코레이터를 사용하고 NestInterceptor 인터페이스를 구현하는 클래스입니다. Aspect Oriented Programming (AOP) 기법에서 영감을 받았어요.
Interceptor의 강력한 기능
- 메서드 실행 전후에 추가 로직 바인딩
- 함수에서 반환된 결과 변환
- 함수에서 발생한 예외 변환
- 기본 함수 동작 확장
- 특정 조건에 따라 함수를 완전히 재정의 (예: 캐싱)
Interceptor 구현 방법
모든 interceptor는 intercept() 메서드를 구현해야 합니다:
import { Injectable, NestInterceptor, ExecutionContext, CallHandler } from '@nestjs/common';
import { Observable } from 'rxjs';
import { tap } from 'rxjs/operators';

@Injectable()
export class LoggingInterceptor implements NestInterceptor {
  intercept(context: ExecutionContext, next: CallHandler): Observable<any> {
    console.log('Before...');

    const now = Date.now();
    return next
      .handle()
      .pipe(
        tap(() => console.log(`After... ${Date.now() - now}ms`)),
      );
  }
}
intercept() 메서드는 두 개의 인자를 받습니다:
ExecutionContext: 현재 실행 컨텍스트에 대한 정보CallHandler:handle()메서드를 통해 라우트 핸들러를 호출
Interceptor 적용하기
@UseInterceptors() 데코레이터를 사용합니다:
@UseInterceptors(LoggingInterceptor)
export class UsersController {}
전역으로 적용하려면:
const app = await NestFactory.create(AppModule);
app.useGlobalInterceptors(new LoggingInterceptor());
RxJS를 활용한 응답 변환
Interceptor의 진정한 힘은 RxJS 연산자를 활용할 수 있다는 점입니다:
@Injectable()
export class TransformInterceptor implements NestInterceptor {
  intercept(context: ExecutionContext, next: CallHandler): Observable<any> {
    return next.handle().pipe(
      map(data => ({ data, timestamp: new Date().toISOString() }))
    );
  }
}
예외 처리도 가능해요:
@Injectable()
export class ErrorsInterceptor implements NestInterceptor {
  intercept(context: ExecutionContext, next: CallHandler): Observable<any> {
    return next
      .handle()
      .pipe(
        catchError(err => throwError(() => new BadGatewayException())),
      );
  }
}
Middleware vs Interceptor: 핵심 차이점
실행 시점
Middleware
- Request lifecycle의 가장 앞단에서 실행
- Guards, interceptors, pipes보다 먼저 동작
- 순차적으로 실행 (전역 → 모듈 바운드 순)
Interceptor
- 컨트롤러 실행 전후로 동작
- Guards 이후, pipes 이전에 실행 (pre-controller)
- 응답 시에는 역순으로 실행 (라우트 → 컨트롤러 → 전역)
기능적 차이
Middleware
- Request와 response 객체에 직접 접근
- 다음 middleware나 핸들러로 제어권 전달 (
next()) - Response cycle을 종료할 수 있음
- RxJS 기능 사용 불가
Interceptor
ExecutionContext로 더 풍부한 컨텍스트 정보 제공- RxJS Observable 기반으로 동작
- 응답 데이터를 변환하거나 예외를 처리할 수 있음
- 라우트 핸들러 실행 전후의 로직을 한 곳에서 관리
접근 범위
Middleware
- HTTP 레이어에만 적용 가능
- WebSocket이나 Microservices에서는 사용 불가
- 경로 기반으로만 적용 가능
Interceptor
- 모든 타입의 애플리케이션 컨텍스트에서 사용 가능
- HTTP, WebSocket, Microservices 모두 지원
- 컨트롤러, 메서드, 전역 단위로 적용 가능
실전 활용: 언제 무엇을 사용할까?
Middleware를 사용하는 경우
1. 요청 로깅
export function requestLogger(req: Request, res: Response, next: NextFunction) {
  console.log(`${new Date().toISOString()} - ${req.method} ${req.url}`);
  next();
}
2. CORS 설정
export function cors(req: Request, res: Response, next: NextFunction) {
  res.header('Access-Control-Allow-Origin', '*');
  res.header('Access-Control-Allow-Methods', 'GET,PUT,POST,DELETE');
  next();
}
3. Body parsing (이미 내장되어 있지만 커스텀 필요 시)
export function customBodyParser(req: Request, res: Response, next: NextFunction) {
  // 특정 형식의 body 처리
  next();
}
4. 세션 관리
@Injectable()
export class SessionMiddleware implements NestMiddleware {
  use(req: Request, res: Response, next: NextFunction) {
    // 세션 초기화 및 검증
    next();
  }
}
Interceptor를 사용하는 경우
1. 응답 형식 통일
@Injectable()
export class ResponseInterceptor implements NestInterceptor {
  intercept(context: ExecutionContext, next: CallHandler): Observable<any> {
    return next.handle().pipe(
      map(data => ({
        statusCode: context.switchToHttp().getResponse().statusCode,
        data,
        timestamp: new Date().toISOString(),
      })),
    );
  }
}
2. 에러 변환
@Injectable()
export class ErrorInterceptor implements NestInterceptor {
  intercept(context: ExecutionContext, next: CallHandler): Observable<any> {
    return next.handle().pipe(
      catchError(error => {
        if (error instanceof EntityNotFoundError) {
          throw new NotFoundException('리소스를 찾을 수 없습니다');
        }
        throw error;
      }),
    );
  }
}
3. 캐싱
@Injectable()
export class CacheInterceptor implements NestInterceptor {
  constructor(private cacheManager: Cache) {}

  async intercept(context: ExecutionContext, next: CallHandler): Promise<Observable<any>> {
    const key = context.switchToHttp().getRequest().url;
    const cachedResponse = await this.cacheManager.get(key);

    if (cachedResponse) {
      return of(cachedResponse);
    }

    return next.handle().pipe(
      tap(response => this.cacheManager.set(key, response)),
    );
  }
}
4. 실행 시간 측정
@Injectable()
export class TimingInterceptor implements NestInterceptor {
  intercept(context: ExecutionContext, next: CallHandler): Observable<any> {
    const now = Date.now();
    const request = context.switchToHttp().getRequest();

    return next.handle().pipe(
      tap(() => {
        const elapsed = Date.now() - now;
        console.log(`${request.method} ${request.url} - ${elapsed}ms`);
      }),
    );
  }
}
실무 팁: 두 개를 함께 사용하기
실제 프로젝트에서는 middleware와 interceptor를 조합해서 사용하는 경우가 많아요:
// Middleware: 인증 토큰 검증
@Injectable()
export class AuthMiddleware implements NestMiddleware {
  use(req: Request, res: Response, next: NextFunction) {
    const token = req.headers.authorization;
    if (!token) {
      throw new UnauthorizedException();
    }
    // 토큰 검증 후 user 정보를 req에 추가
    req.user = verifyToken(token);
    next();
  }
}

// Interceptor: 사용자별 응답 커스터마이징
@Injectable()
export class UserContextInterceptor implements NestInterceptor {
  intercept(context: ExecutionContext, next: CallHandler): Observable<any> {
    const request = context.switchToHttp().getRequest();
    const user = request.user;

    return next.handle().pipe(
      map(data => ({
        ...data,
        requestedBy: user.id,
        permissions: user.permissions,
      })),
    );
  }
}
정리하며
Middleware와 interceptor는 각각의 장점이 명확합니다:
Middleware는 이럴 때:
- Request lifecycle 초반에 실행되어야 할 때
- Express의 기능을 그대로 활용하고 싶을 때
- 경로 기반으로 간단하게 로직을 추가하고 싶을 때
Interceptor는 이럴 때:
- 응답 데이터를 변환하거나 가공해야 할 때
- RxJS의 강력한 연산자를 활용하고 싶을 때
- 컨트롤러 실행 전후의 로직을 한 곳에서 관리하고 싶을 때
- WebSocket이나 Microservices에서도 사용해야 할 때
두 기능을 적절히 조합하면 깔끔하고 유지보수하기 좋은 코드를 작성할 수 있어요. Request lifecycle을 머릿속에 그리면서 각 단계에 맞는 도구를 선택하는 게 핵심입니다 !