NestJS: MiddlewareとInterceptorの違いと使い方を解説
NestJSでバックエンドを開発していると、middlewareとinterceptorをいつ使うべきか迷うことがあります。どちらもリクエストとレスポンスの間にロジックを追加できますが、実行タイミングとできることが異なります。
この記事では、NestJSのリクエストライフサイクル(request lifecycle)をベースに、middlewareとinterceptorの違いを明確に整理し、実務でどんな場面でどちらを使うべきかを見ていきます。
NestJSのRequest Lifecycleを理解する
NestJSでリクエストが入り、レスポンスが出るまでの流れを「request lifecycle」と呼びます。この流れを理解すると、middlewareとinterceptorがどこで実行されるかが明確になります。
Request Lifecycleの順序
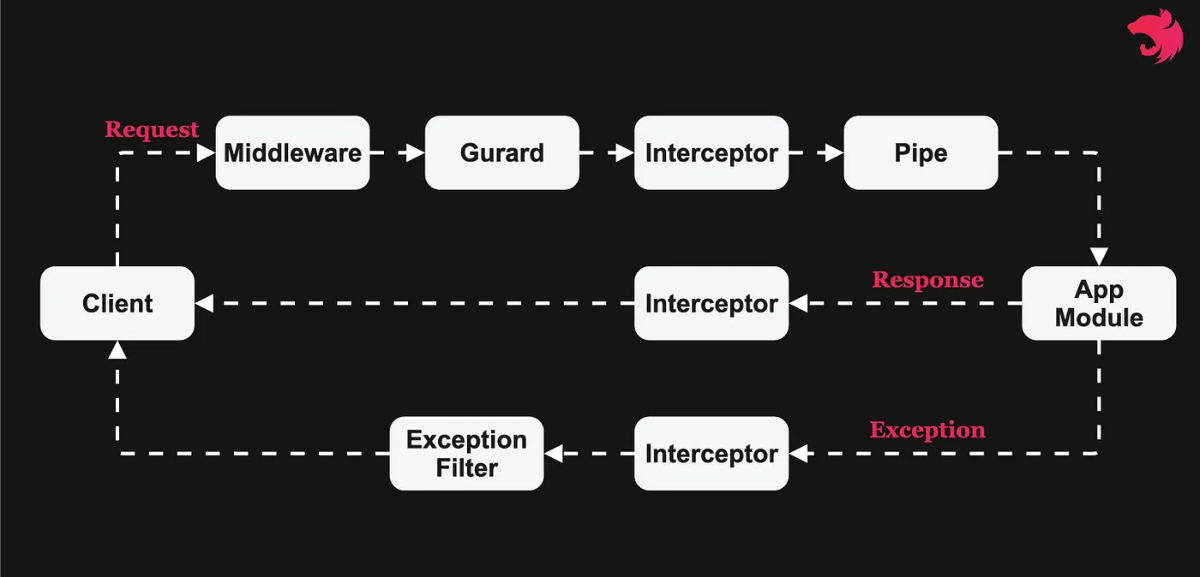
この順序を見てみると、middlewareは最も前段、interceptorはコントローラの前後に実行されることが分かります。この違いこそがそれぞれの用途を決める“鍵”です。
Middlewareとは?
Middlewareは、ルートハンドラが実行される前に呼び出される関数です。Expressのmiddlewareと同じ概念で、request、response、next()にアクセス可能です。
Middlewareの主な機能
- 任意のコードを実行
- requestとresponseオブジェクトの修正
- request‑responseサイクルの終了
- 次のmiddlewareの呼び出し
Middlewareの実装方法
クラスベース、関数型、2つの方式があります。
クラスベースのmiddleware:
import { Injectable, NestMiddleware } from '@nestjs/common';
import { Request, Response, NextFunction } from 'express';

@Injectable()
export class LoggerMiddleware implements NestMiddleware {
  use(req: Request, res: Response, next: NextFunction) {console.log(`[${req.method}] ${req.url}`);next();
  }
}
関数型のmiddleware:
export function logger(req: Request, res: Response, next: NextFunction) {
  console.log(`[${req.method}] ${req.url}`);
  next();
}
Middlewareの適用方法
モジュールの configure() メソッドを使って適用します:
import { Module, NestModule, MiddlewareConsumer } from '@nestjs/common';

@Module({})
export class AppModule implements NestModule {
  configure(consumer: MiddlewareConsumer) {consumer  .apply(LoggerMiddleware)  .forRoutes('users'); // 特定のパスにのみ適用
  }
}
特定のパスを除外したい場合は exclude() を使います:
consumer
  .apply(LoggerMiddleware)
  .exclude({ path: 'users', method: RequestMethod.GET },'users/(.*)',
  )
  .forRoutes(UsersController);
グローバルに適用したいなら main.ts で設定します:
const app = await NestFactory.create(AppModule);
app.use(logger);
Interceptorとは?
Interceptorは @Injectable() デコレータを使い、 NestInterceptor インターフェースを実装したクラスです。アスペクト指向プログラミング(AOP)からインスパイアされた手法です。
Interceptorの強力な機能
- メソッドの実行前・後に追加ロジックをバインド
- 関数が返した結果を変換
- 関数内で発生した例外を変換
- 基本的な関数動作を拡張
- 特定条件に応じて関数をまるごと再定義(例:キャッシング)
Interceptorの実装方法
すべてのInterceptorは intercept() メソッドを実装しなければなりません:
import { Injectable, NestInterceptor, ExecutionContext, CallHandler } from '@nestjs/common';
import { Observable } from 'rxjs';
import { tap } from 'rxjs/operators';

@Injectable()
export class LoggingInterceptor implements NestInterceptor {
  intercept(context: ExecutionContext, next: CallHandler): Observable<any> {console.log('Before...');
const now = Date.now();return next  .handle()  .pipe(    tap(() => console.log(`After... ${Date.now() - now}ms`)),  );
  }
}
intercept() メソッドは次の2つの引数を受け取ります:
ExecutionContext: 現在の実行コンテキストに関する情報CallHandler:handle()メソッドを通じてルートハンドラを呼び出す
Interceptorの適用方法
@UseInterceptors() デコレータを使います:
@UseInterceptors(LoggingInterceptor)
export class UsersController {}
グローバルに適用するには:
const app = await NestFactory.create(AppModule);
app.useGlobalInterceptors(new LoggingInterceptor());
RxJSを活用したレスポンス変換
Interceptorの真価は、RxJSの演算子を活用できるところです:
@Injectable()
export class TransformInterceptor implements NestInterceptor {
  intercept(context: ExecutionContext, next: CallHandler): Observable<any> {return next.handle().pipe(  map(data => ({ data, timestamp: new Date().toISOString() })));
  }
}
例外処理も可能です:
@Injectable()
export class ErrorsInterceptor implements NestInterceptor {
  intercept(context: ExecutionContext, next: CallHandler): Observable<any> {return next  .handle()  .pipe(    catchError(err => throwError(() => new BadGatewayException())),  );
  }
}
Middleware vs Interceptor:主な違い
実行タイミング
Middleware
- Request lifecycleの最も前段で実行
- Guards、interceptors、pipes より先に動作
- 順次実行される(グローバル → モジュールバウンド順)
Interceptor
- コントローラ実行の前後で動作
- Guardsの後、Pipesの前に実行(pre‑controller)
- レスポンス時には逆順で実行(ルート → コントローラ → グローバル)
機能的な違い
Middleware
- RequestやResponseオブジェクトに直接アクセス
- 次のmiddlewareやハンドラへ制御を渡す(
next()) - レスポンスサイクルを終了できる
- RxJS機能は使えない
Interceptor
ExecutionContextによるより豊富なコンテキスト情報を提供- RxJSのObservableベースで動作
- レスポンスデータを変換したり、例外を処理できる
- ルートハンドラ実行の前後を一元管理できる
適用範囲
Middleware
- HTTPレイヤーにのみ適用可能
- WebSocketやMicroservicesでは利用不可
- パス(ルート)ベースでのみ適用可能
Interceptor
- すべてのタイプのアプリケーションコンテキストで使用可能
- HTTP、WebSocket、Microservicesすべてサポート
- コントローラ、メソッド、グローバル単位で適用可能
実務活用:いつどちらを使うか?
Middlewareを使うケース
1. リクエストログ
export function requestLogger(req: Request, res: Response, next: NextFunction) {
  console.log(`${new Date().toISOString()} - ${req.method} ${req.url}`);
  next();
}
2. CORS設定
export function cors(req: Request, res: Response, next: NextFunction) {
  res.header('Access-Control-Allow-Origin', '*');
  res.header('Access-Control-Allow-Methods', 'GET,PUT,POST,DELETE');
  next();
}
3. Body parsing(既に内蔵されているがカスタムが必要な場合)
export function customBodyParser(req: Request, res: Response, next: NextFunction) {
  // 特定形式の body を処理
  next();
}
4. セッション管理
@Injectable()
export class SessionMiddleware implements NestMiddleware {
  use(req: Request, res: Response, next: NextFunction) {// セッション初期化および検証next();
  }
}
Interceptorを使うケース
1. レスポンス形式の統一
@Injectable()
export class ResponseInterceptor implements NestInterceptor {
  intercept(context: ExecutionContext, next: CallHandler): Observable<any> {return next.handle().pipe(  map(data => ({    statusCode: context.switchToHttp().getResponse().statusCode,    data,    timestamp: new Date().toISOString(),  })),);
  }
}
2. エラー変換
@Injectable()
export class ErrorInterceptor implements NestInterceptor {
  intercept(context: ExecutionContext, next: CallHandler): Observable<any> {return next.handle().pipe(  catchError(error => {    if (error instanceof EntityNotFoundError) {      throw new NotFoundException('リソースが見つかりません');    }    throw error;  }),);
  }
}
3. キャッシング
@Injectable()
export class CacheInterceptor implements NestInterceptor {
  constructor(private cacheManager: Cache) {}

  async intercept(context: ExecutionContext, next: CallHandler): Promise<Observable<any>> {const key = context.switchToHttp().getRequest().url;const cachedResponse = await this.cacheManager.get(key);
if (cachedResponse) {  return of(cachedResponse);}
return next.handle().pipe(  tap(response => this.cacheManager.set(key, response)),);
  }
}
4. 実行時間の計測
@Injectable()
export class TimingInterceptor implements NestInterceptor {
  intercept(context: ExecutionContext, next: CallHandler): Observable<any> {const now = Date.now();const request = context.switchToHttp().getRequest();return next.handle().pipe(  tap(() => {    const elapsed = Date.now() - now;    console.log(`${request.method} ${request.url} - ${elapsed}ms`);  }),);
  }
}
実務的なヒント:2つを一緒に使う
実際のプロジェクトでは、middlewareとinterceptorを組み合わせて使うことが多いです:
// Middleware:認証トークン検証
@Injectable()
export class AuthMiddleware implements NestMiddleware {
  use(req: Request, res: Response, next: NextFunction) {const token = req.headers.authorization;if (!token) {  throw new UnauthorizedException();}// トークン検証後、user 情報を req に追加req.user = verifyToken(token);next();
  }
}

// Interceptor:ユーザー別レスポンスのカスタマイズ
@Injectable()
export class UserContextInterceptor implements NestInterceptor {
  intercept(context: ExecutionContext, next: CallHandler): Observable<any> {const request = context.switchToHttp().getRequest();const user = request.user;
return next.handle().pipe(  map(data => ({    ...data,    requestedBy: user.id,    permissions: user.permissions,  })),);
  }
}
まとめると
middlewareとinterceptorは、それぞれ明確な利点があります:
Middlewareを使うべき状況:
- リクエストライフサイクルの初期段階で実行される必要があるとき
- Expressの機能をそのまま活用したいとき
- パスベースでシンプルにロジックを追加したいとき
Interceptorを使うべき状況:
- レスポンスデータを変換・加工したいとき
- RxJSの強力な演算子を使いたいとき
- コントローラ実行の前後のロジックを一箇所で管理したいとき
- WebSocketやMicroservicesでも共通で使いたいとき
この2つを適切に組み合わせることで、きれいでメンテナンスしやすいコードが書けます。リクエストライフサイクルを頭に思い描きながら、各段階に応じたツールを選ぶことが鍵です!